New Features in iOS 10: How to Use Memories in Photos?
Summary: With iOS 10, Apple added a smart tab called Memories to the Photos app. It’s a powerful yet underestimated feature, which can scan your photo library deeply and rediscover those cherished and forgotten memories. Still have no idea how it works? Read this article to find out.
At the launch of the iPhone 6s and 6s Plus, we were amazed by Live Photos, which is a remarkable camera feature that brings your photos to life by creating a moving image. Then what's New in Photos for iOS 10? This time Apple made the Photos app on your iPhone smarter with a tab called “Memories”. Yet you may underrate the power of it, or even have not noticed it. Here's what you need to know.
Part 1: What is Memories in Photos for iOS 10?
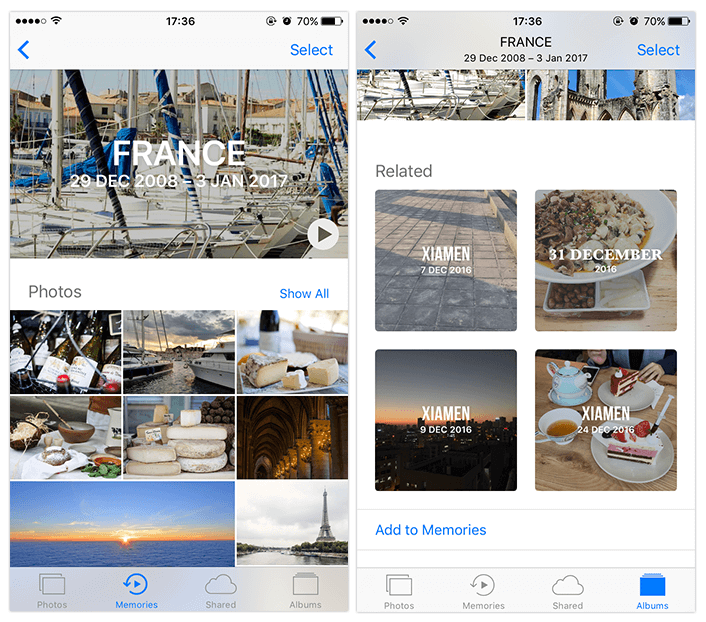
When you first open the Photos app in iOS 10, you’ll find a Memories tab on menu bar. The new feature in the Photos allows you to rediscover those photos you haven’t seen for a while or even have forgotten. Memories automatically create meaningful slideshow with background music from your image library. In other words, you can take it as a photo slideshow creator.
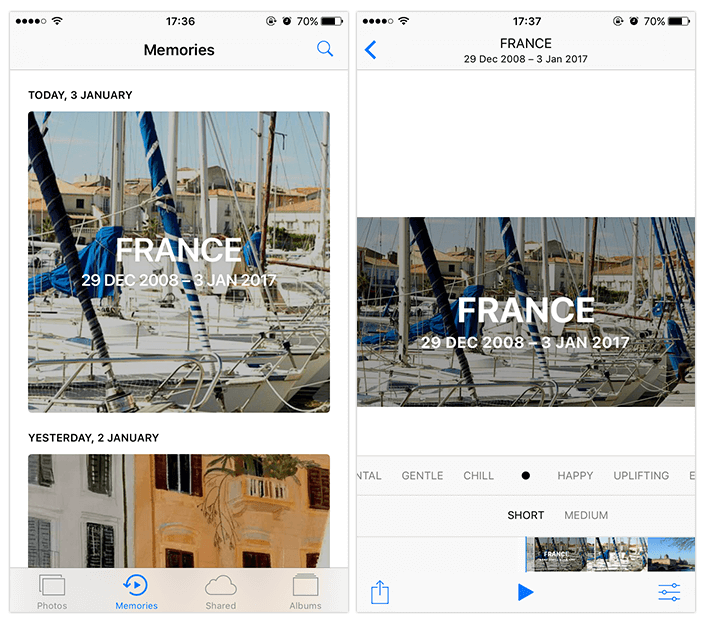
So how can I view the content in Memories? Open Photos on your iPhone, tap Memories at the bottom of the screen, and you’ll see the photo slideshows presented in curated collections.
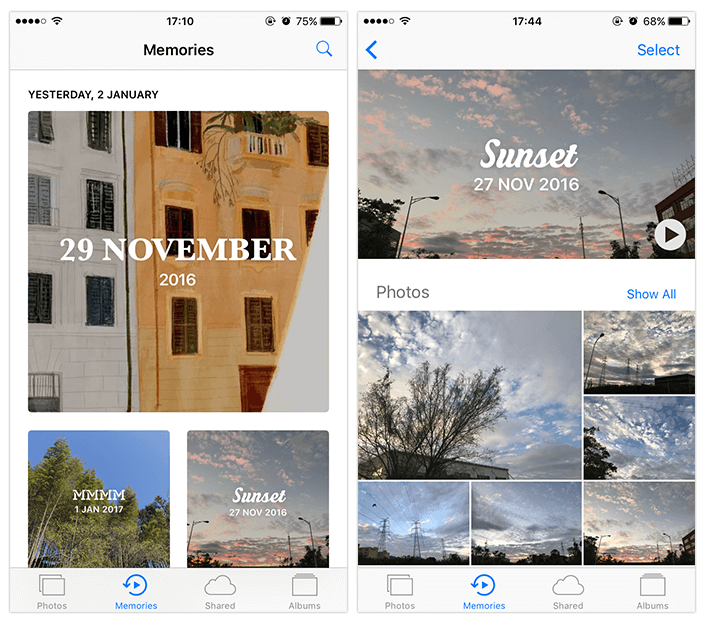
Notice that not all the Memories will be created automatically, and you can customize your own Memories as you like. In the following tutorial you’ll learn how to view, edit and share Memories, so that you can create your unforgettable moments with animated photo slideshow on your iPhone.
Part 2: How to create Photo Memories on iPhone?
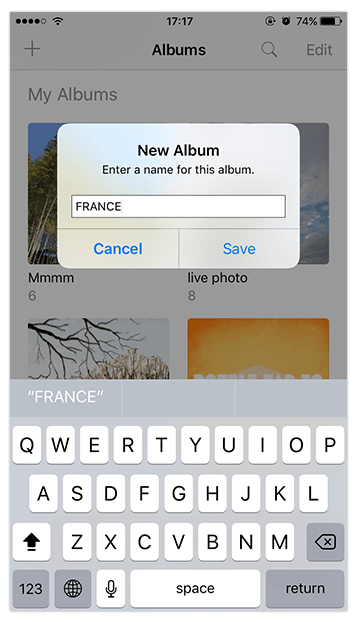
Step 1: Create a new album. Open Photos app and go to the Albums page. Find the plus button on the top left. Tap the plus button to create a new album, and enter a name for this album.
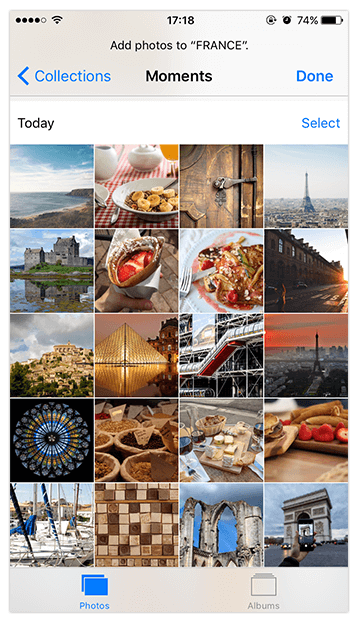
Step 2: Add photos. After you name the new album, the Moments page will pop up instantly. Select the photos you would like to add to the Memories.
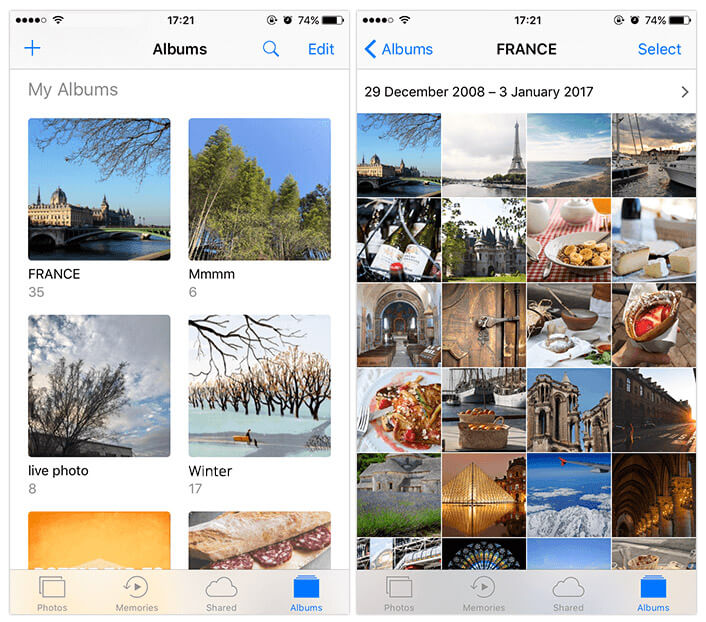
Step 3: Add album to memories. Tap on the header of the date, and you will move to the page of the album info. Scroll to the bottom of the screen and tap on “Add to memories”. Then you can play the newly created slideshow in Memories.
You just make a Memory in 3 steps. If you want to make it to your style, you can set different moods to match your Memory’s content. Under the slideshow, you can choose different themes such as Dreamy, Gentle, Club and so on. The music and title style of the slideshow will match the mood you pick. As for length, you can set the duration of your Memory to Short, Medium, or Long in terms of the number of photos.
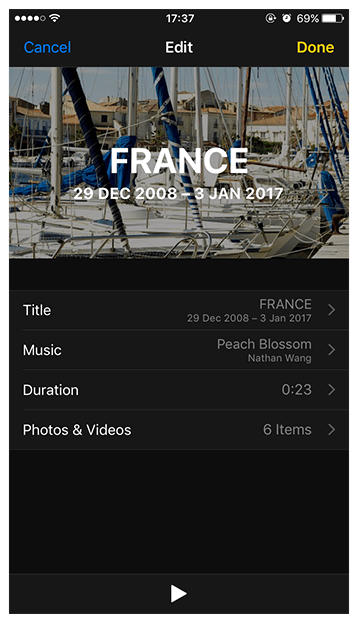
For further edit, you can tap  to customize the slideshow - you can change the title, font, music, pick the photos included in the Memory movie, and more.
Part 3: Q&A for creating Memories
Question 1: “I create the new Album and add photos to it, but it doesn’t exit on Memories.”
Answer: After adding photos, please note that you must tap “Add to Memories” at the bottom of the Album page.
Question 2: “I follow the steps above, but the Memories is still not working.”
Answer: You need to select at least 8 photos in an Album, otherwise the Memories only displays your photos piece by piece without slideshow.
Question 3: “Why can’t I find the Memories tab in Photos app?”
Answer: Before you begin, please make sure you’ve already updated your iPhone to iOS 10 or the latest version.
Question 4: “How can I save and share the Memories?”
Answer: Play a Memory slideshow, and tap on it to see the sharing icon. Tap  and choose to share the slideshow via Mail, Facebook, YouTube etc. And you can tap on “Save video” to save it on iPhone.
Memories is a remarkable feature which makes you a great curator of your photos. So, what are you waiting for? Go ahead, open Photos and explore the Memories with fun. If you have any questions about how to create Memories in Photos, let us know in the comments.
 The Best Mobile Wallpapers for iPhone 7
Now that Apple‘s new iPhone7 and iPhone7 Plus have arrived, are you wishing to get your very own special wallpapers for your new iPhone and make your iPhone 7 much more attractive than others? Try with AmoLink and create your own iPhone wallpapers to decorate your new gadget or share the pictures taken by iPhone 7 Plus via the photo collages and greeting cards you made.
The Best Mobile Wallpapers for iPhone 7
Now that Apple‘s new iPhone7 and iPhone7 Plus have arrived, are you wishing to get your very own special wallpapers for your new iPhone and make your iPhone 7 much more attractive than others? Try with AmoLink and create your own iPhone wallpapers to decorate your new gadget or share the pictures taken by iPhone 7 Plus via the photo collages and greeting cards you made.
 29 Things You Need to Know About Donald Trump
Have you accepted the suprise outcome yet? Anyway, you got to know more about the future president.
29 Things You Need to Know About Donald Trump
Have you accepted the suprise outcome yet? Anyway, you got to know more about the future president.
 How to Say Thank You in Different Languages
We use thank you every single day. In modern life, it’s necessary to know how to say thank you in different languages under globalization. This article will show you how to say thank you in Spanish, Italian, French, German, Japanese, Chinese, Korean and Russian. And we also offer some tutorial videos on YouTube for your further learning.
How to Say Thank You in Different Languages
We use thank you every single day. In modern life, it’s necessary to know how to say thank you in different languages under globalization. This article will show you how to say thank you in Spanish, Italian, French, German, Japanese, Chinese, Korean and Russian. And we also offer some tutorial videos on YouTube for your further learning.